
Sending Emails
Member Wizard allows you to email your membership as a whole, individually, by membership type or in whatever groups you wish to create. If you have created custom field of type "email" you can choose to send to those emails as well as to the primary email address if you wish, or you can exclude the primary email address.
Emailing an Individual Member
To email an individual member, open the member record from Members List, select the member and click the Email Member button in the left Action menu.
If the member has more than one email address you will be able to select which of their email addresses you wish to send to by either selecting Use primary email address or by selecting the alternate email address from the Choose Custom email address drop down list. You can also elect to send to both.

Schedule email for sending
If you wish to schedule a time to send the email in the future you can do so by checking the box Schedule Send. Time will be provided in UTC time unless you have set your Time Zone setting in Settings/Organisation Details on the Email tab

You can view emails queued to be sent in the Queued Emails menu.
Emailing a number of members
To email more than one member, access the Email Members function under Communication in the main navigation.
If you wish to email All members click NEXT - you will be able to select individual members on the following screen.
To email a Membership Type or Group of members
If you wish to select a Membership Type/s or Group click the Filter field and you can multi-select which ever groups, membership types, classes or tutors you choose. The system automatically defaults to only Active members however you can change this by selecting either Inactive or Both from the Membership Status drop down.

On the following screen you can deselect any members from your list that you do not want included in receiving the email. To remove all members from the send list, click the green Select Recipients box. When you are ready click Next to enter the email body.
On this screen you can enter your email Subject and write your actual email. Note that you will not be able to Send the email unless you have entered a Subject in the relevant field. The email entry screen has a number of editing and formatting tools including inserting an image or linking to external web sites etc. The icons used to represent these features are standard across most software applications so will not be described here in any detail.
If you wish for responses to the email to go to another member in your database you can click the Change Reply to button and select the member who is to receive any replies. .
.
Schedule email for sending
If you wish to schedule a time to send the email in the future you can do so by checking the box Schedule Send. Time will be provided in UTC time unless you have set your Time Zone setting in Settings/Organisation Details on the Email tab
Using Merge Tags
If you wish to personalise your emails you can do so with either First or Last name, Member No., Organisation name or Preferred Name. To use a merge tag click the last icon in the email text box menu

Using Find and Replace in email body text click the 2nd last icon in the email body text menu.

Adding Attachments
Your email can include attachments which you must first upload to the system.
To add an attachment click the Add Attachment button to the bottom left of the email body screen
 .
.
1. Click the Load File green button and find the attachment you wish to send on your computer. Select the file and click the Open button at the bottom of the file window.
2. The file will load into the system and will already be selected ready to attach. You can add further attachments as required however the total size of all files attached must be no greater than 7mb.
3. When you have uploaded all files, click the Return to Message button to the bottom right of the screen.
4. You will be returned to your email message and the name/s of your attachment/s will appear above your message.
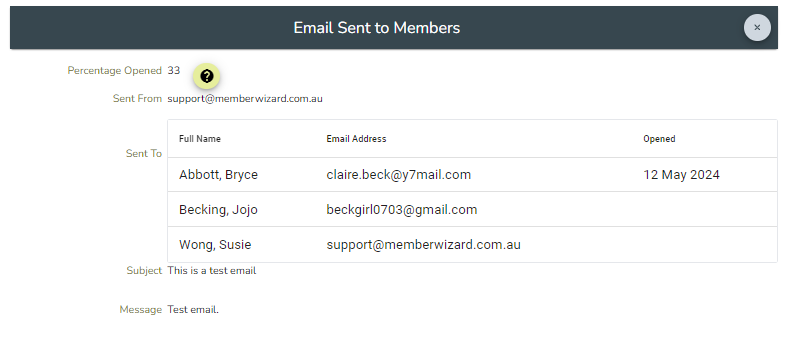
The final step occurs once you click Send at the bottom right of the screen. After all emails have been sent the system will return a message to you advising you of the total number of emails sent.
You can view all emails sent by accessing the Communications Sent function under Communication in the main navigation.
Using an already uploaded Attachment
When you upload an attachment it stays active only while being attached and will then be flagged as Inactive. If you wish to leave the attachment as permanently Active and able to be selected you must reactivate it. Do this in Communications/Manage Attachments. Change the Status filter at the top of the page from Active to Inactive, select the attachment and click the Make Attachment Active button at the bottom of the page.
Adding a Template to an Email
You can add a previously created Email Template to an email by clicking the Add Template button and selecting the template you wish to insert.
The process to create and add Templates to an email is covered in detail in the Help File associated with Templates under Communications/Templates.
Using Links instead of Attachments
It is sometimes better to send a link to a document rather than emailing the document. This is especially useful if the attachment is large - it is also how you can distribute emails with a size over the limit of 5MB.
Upload your document to Member Wizard Documents section ensuring the box marked Public is ticked. After you have uploaded the document, highlight it in its Document folder and click Edit. There is a button which if clicked will give you a link you can copy and paste into your email. Your recipient can click on the link and will be able to read the document.